RustOps: Discord Bot
 RustOps Bot ChatGPT Generated PFP
Introduction
This blog post will provide the complete walkthrough steps for getting my RustOps Discord bot up and running. This includes creating the discord bot itself, getting the necessary API tokens, and setting up a server to run the bot. While this blog post is meant to be a full technical walkthrough, I do assume some level of prior technical knowledge such as understanding git and the command-line. Please reach out to me on Discord (Username: kidbuu2) for any questions, comments, or concerns.
1. Creating a Discord Bot
The section covers creating the RustOps (or whatever name you decide to give it) Discord bot.
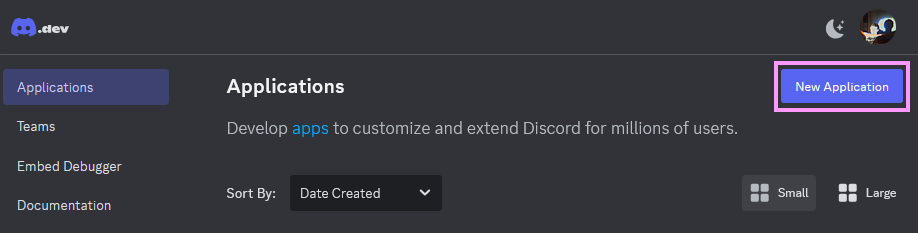
1.1 - Create New Application (Bot)
First sign in to Discord’s developer portal using your existing Discord account. Once you’re signed select Applications -> New Application and give your bot a name (RustOps perhaps?). Under “General Information” you can give your bot a display name, description, and Bot profile picture (pfp). I used ChatGPT to generate a pfp for the bot using a description of RustOps’ features in the prompt.
 Discord Developer Creating a New Application
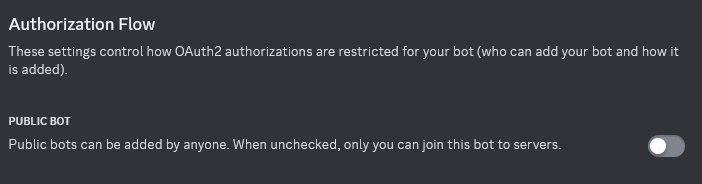
1.2 - Configuring Bot
Navigate to the “Bot” settings tab. Upload your bot’s profile picture and give the bot a username. Then ensure that “Public Bot” is unchecked. This will make it so that only we can install this bot onto a server. Additionally, under “Privileged Gateway Intents” ensure that “Message Content Intent” is checked.
 Discord Public Bot Option Unchecked
 Bot “Message Content Intent” Checked
1.3 - Grant Bot Necessary Permissions
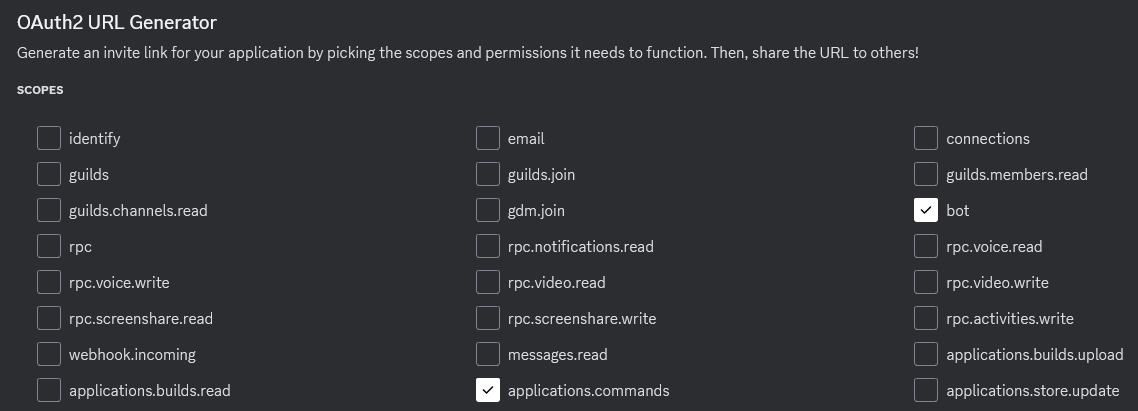
The next step is to grant our Discord bot the necessary permissions it needs to function within our Discord server (which is referred to as a Guild in Discord documentation and developer portal). To define the necessary permissions navigate to the “OAuth2” settings tab. Scroll down to the “OAuth2 URL Generator” section. First, check the following two (2) permission scopes:
- bot
- applications.commands
 OAuth Perms URL Generator
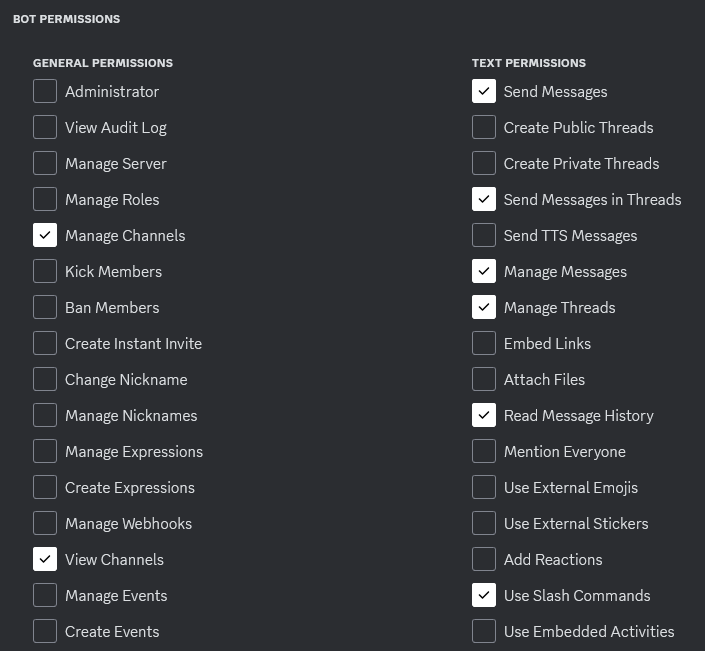
Then make sure to check the following permissions:
- Manage Channels
- Manage Messages
- Manage Threads
- Read Message History
- Send Messages
- Send Messages in Threads
- Use Slash Commands
- View Channels
 Bot Guild/Channel Permissions
Once all of the necessary permissions have been selected we will have our necessary installation URL. Copy the bot’s installation link and paste this into your browser. This will allow a server to be selected for the bot to be added to.
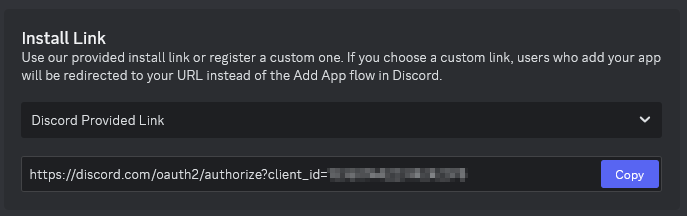 Bot Installation URL
2. Obtaining a Steam Web API Key
The second step for setting up the RustOps Discord bot is to obtain a Steam Web API key. Navigating to the API documentation page we can see what APIs are available (our target is the ISteamUser) and what’s required to obtain an API key. RustOps uses this to convert Steam profile URLs (steam ID or vanity URL) to retrieve their unique Steam player ID and display name.
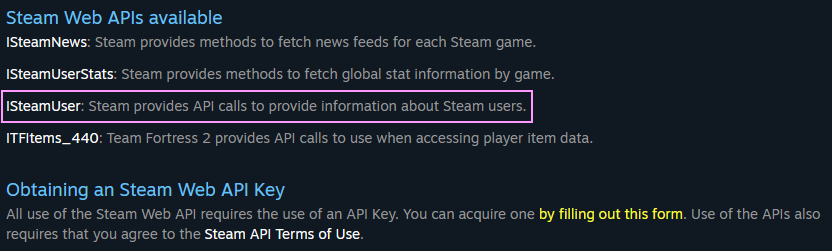 Steam Web API
2.1 - Register for API Key
To create a Steam Web API Token you will need to log into the Steam Community website and create a new API key registration. Note: You do not need to use a valid domain for this process. Navigate to the Steam API Key Registration website and Sign In. Add a Domain Name, agree to the terms, and click Register (Game Learning Society). Under Steam API Key you should now see your personal API key. Instructions for what to do with this API Key will be referenced later on when setting up hosting for the discord bot.
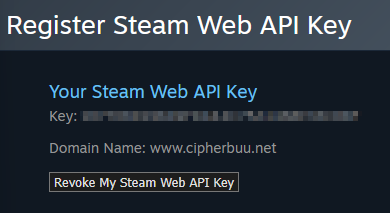 Steam Web API Key Attached to Domain
3. Obtaining a BattleMetrics Premium API Key
The third step is to obtain a BattleMetrics API key. RustOps utilizes data from Battlemetrics that requires a premium subscription to be purchased. If you decide to go the free route (which I do not currently outline how to setup) for hosting the Discord bot then this will be the only necessary monthly expense. At the time of writing this blog post this costs about $5/month.
- BattleMetrics : API Documentation
- BattleMetrics : Developer Page
3.1 - Generate BattleMetrics API Token
If you do not already have an account then please register one on the site. Once your account has been registered then navigate to the Developers Page and select “New Token”.
 BattleMetrics Generate API Token
3.2 - Select Necessary Permissions
First write a description that can be used to identify what this token’s purpose is, such as “RustOps - Rust Group Session Tracking Discord Bot” for example. Now I am no expert so I BELIEVE these are the minimum permissions necessary for the RustOps bot to function. Then select “Create Token” and make sure to copy this token to a secure location.
 BattleMetrics API Token Generated
The bot is mostly pulling information that is freely accessible from the BattleMetric’s database. However, some features require a premium monthly subscription. Generating this token will enable our bot to access these premium features. Below are the premium BattleMetrics features that the RustOps Discord bot utilizes.
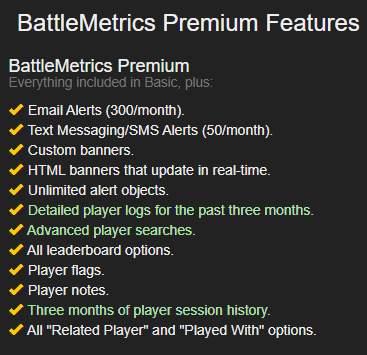 BattleMetrics Premium Features Required for Bot
4. Discord Bot Hosting
The fourth and final step to get the Discord bot up and running is to choose your method for hosting the bot. I have outlined two (2) methods to choose from. The first option (4a) walks through a paid (~$12/month) cloud-hosted method using Heroku. The second option (4b) walks through a free alternative by running the Discord bot locally.
Running the Discord bot locally takes up your host PC’s resources (unless of course, you have a secondary PC like a laptop). That’s about the only primary difference I can think of as to which option you would choose.
4a. (PAID) Heroku ($12 - 7/month)
This section walks through the steps to host the Discord bot on the Cloud using Heroku as the provider. Note, I used Windows to configure Heroku. The same steps should be very similar on another Heroku-supported operating system.
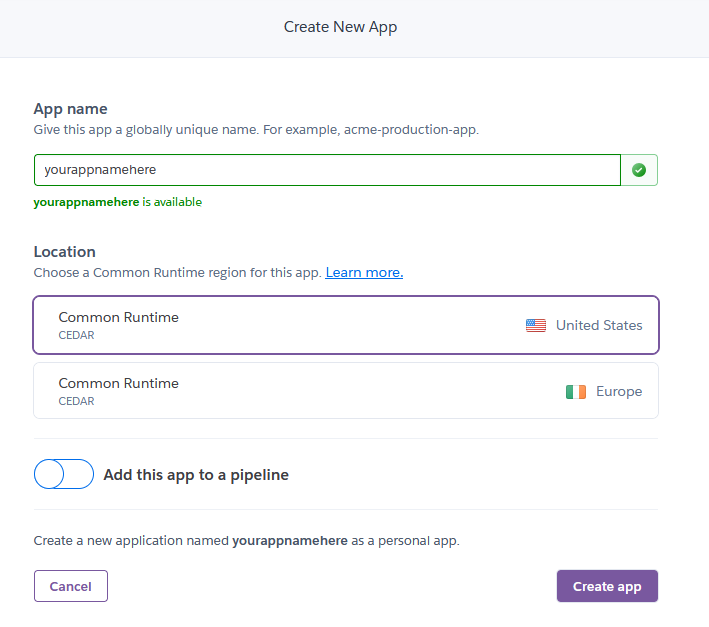
(2) Create Heroku Application
If you do not already have an account on Heroku then go ahead and create one. Once you have an account navigate to your Dashboard –> New –> Create new app. Give this app any name you want that fits the naming conventions. This application will not be accessible to us.
 Heroku New Application
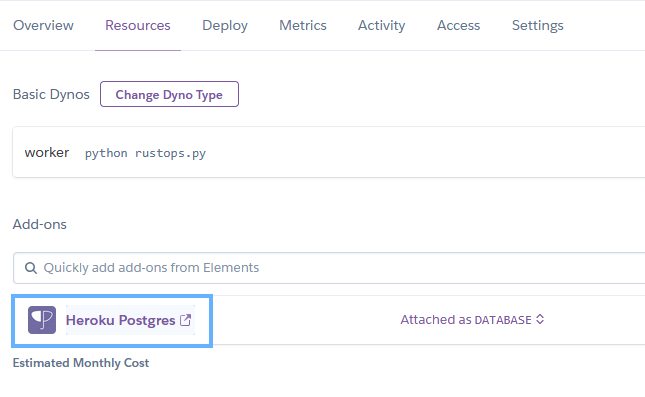
(3) Add PostgreSQL Addon
The application will now show up in our dashboard. The next step is to add the “Heroku Postgres” addon for supporting PostgreSQL. This database will be used to track groups and the players in those groups. Within the newly created application’s dashboard select Resources –> Add-ons –> Search & select Heroku Postgres –> Essential 0. The cheapest plan is more than enough to support RustOps.
 Heroku PostgreSQL Addon
Once the addon has been successfully added to our application we need to grab the unique URL that the RustOps bot will use to authenticate securely to the database. Under the “Resources” tab select the “Heroku Postgres” hyperlink. This will redirect you to Heroku’s PostgreSQL management endpoint. Once you’ve connected to the management endpoint navigate to “Settings” –> Under Administration select “View Credentials” –> copy the URL string in the URI column. This will be used later when configuring the bot’s environment configuration variables.
 Heroku PostgreSQL Addon URL
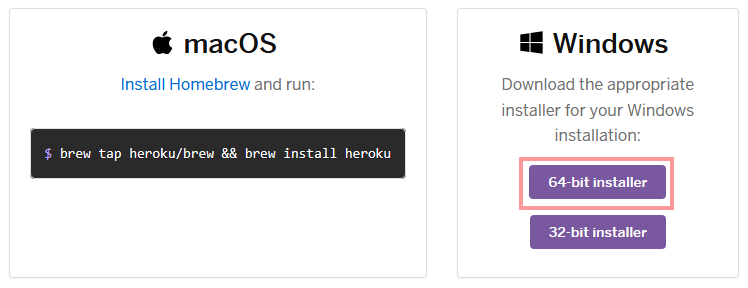
(4) Install Git
Windows does not come with git pre-installed; Therefore, if have not already installed git then do so now. The Windows 64-bit installer can be found here. The installation can be verified by executing git --version in a CMD prompt. The next section explains how to open a CMD prompt to work with the Heroku application from a command line interface.
 Git Version
(5) Install Heroku
With the application created and the backend added on the next step is to get Heroku and PostgreSQL installed on our systems. Note, I used Windows to configure Heroku. The same steps should be very similar on another Heroku-supported operating system. Navigate to Heroku CLI’s documentation which walks through installing Heroku. In my case, I downloaded and ran the Windows 64-bit installer.
 Heroku Windows Installer
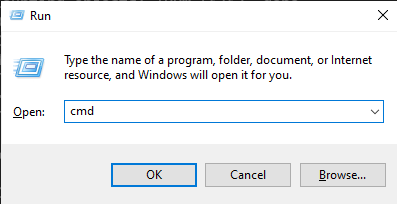
With Heroku installed on our system press Windows Key + R –> Type cmd –> Press ok. This will open a Command Prompt terminal for us.
 Opening CMD Prompt
In the terminal type Heroku login and press enter. This will redirect you to a Heroku login page in your browser. If you’re already signed in then simply pressing login will automatically use your existing session. Otherwise, just re-login to your Heroku account. This will connect our current command prompt session to our Heroku account.
 Heroku CMD Login
Just noting that the application and the PostgreSQL addon could both be added from CMD using Heroku commands. To access our already created Heroku application we first need to grab the Heroku Git URL. Navigate back to the Heroku application’s Settings tab and copy the Git URL.
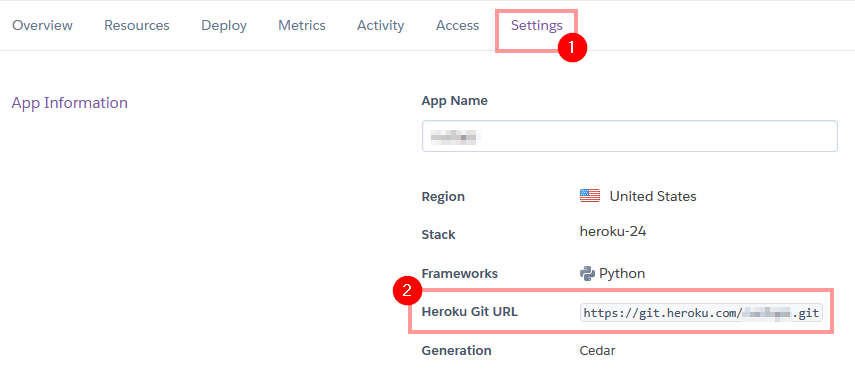 Heroku App Repo URL
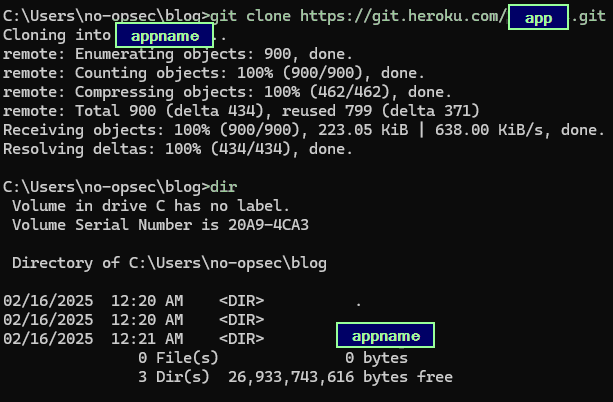
Then back in our command prompt copy this repository in our current working directory.
1
git clone https://git.heroku.com/<herokuappname>.git
On the first attempt to clone the repository, you might get an authentication failure. The next time we run the clone command it should prompt for authentication; However, this isn’t expecting our password instead we need to grab a token using our Heroku session. Copy the following token outputted by running the following command:
1
heroku auth:token
 Heroku Token Authorization
Then re-run the git clone command and enter your Heroku account’s email in the username field and the auth token you just copied into the password field.
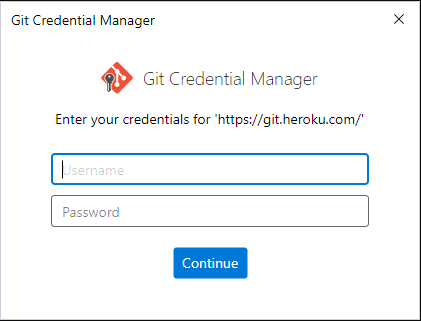 Heroku Git Credential Authentication
This should result in a successful cloning of the application’s repository. To check this enter dir into the CMD prompt and you should have a directory matching the application’s name. Change into this directory by typing cd <appname> as seen from dir output.
 Heroku Successful App Repo Clone
(5) Install PostgreSQL
PostgreSQL does not come pre-installed on Windows systems; Therefore, download PostgreSQL to the system using their installer executable. The installation can be verified by executing postgres --version in a CMD prompt.
 PostgreSQL Successfully Installed
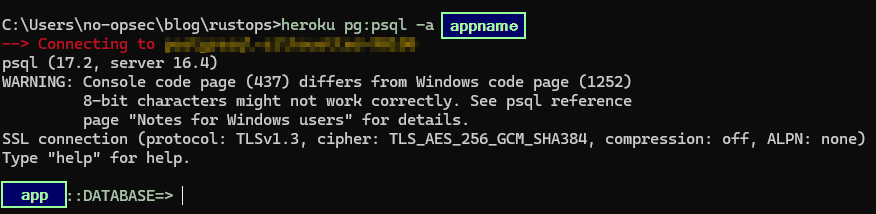
(6) Configure PostgreSQL Tables
With the Heroku application’s repository cloned locally on our system, git, and PostgreSQL installed the next step is to configure the groups and last_checked tables. Execute the following command to connect to the Heroku application’s PostgreSQL database.
1
heroku pg:psql -a herokuappname
 Connected to Database
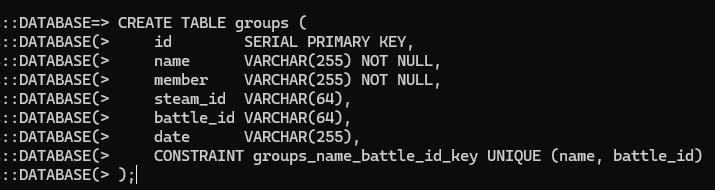
Group Member Tracking Table
1
2
3
4
5
6
7
8
9
CREATE TABLE groups (
    id        SERIAL PRIMARY KEY,
    name      VARCHAR(255) NOT NULL,
    member    VARCHAR(255) NOT NULL,
    steam_id  VARCHAR(64),
    battle_id VARCHAR(64),
    date      VARCHAR(255),
    CONSTRAINT groups_name_battle_id_key UNIQUE (name, battle_id)
);
id: Unique identifier for each row added.name: Stores the group name.member: Stores the group member’s display name.steam_id: Store group member’s steam ID (can be empty); This is populated when adding a player to a group using their Steam profile URL.battle_id: Store group member’s BattleMetrics player ID; This is populated when adding a player to a group using their Battle player ID.data: Date group member was added to the table.
The first table to create is the groups table which will track each group’s members. To start, copy and paste the SQL code into CMD prompt to create the groups table. Reference the bulleted list for an explanation of each column’s purpose.
 SQL Group Tracking Table
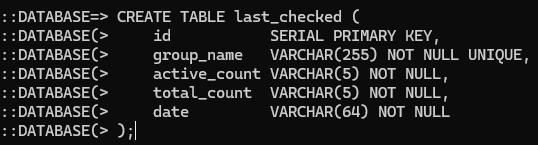
Last Time Group Was Checked Table
1
2
3
4
5
6
7
CREATE TABLE last_checked (
    id           SERIAL PRIMARY KEY,
    group_name   VARCHAR(255) NOT NULL UNIQUE,
    active_count VARCHAR(5) NOT NULL,
    total_count  VARCHAR(5) NOT NULL,
    date         VARCHAR(64) NOT NULL
);
id: Unique identifier for each row added.group_name: The group’s name.active_count: Total number of active players the last time the group was checked.total_count: Total number of players in the group.date: How long from the current time when running/group listthat the group was previously checked for active players. This will show up as Never if the group has yet to be checked.
The next table to create is the last_checked table. Copy and paste the SQL code into the Postgres CLI prompt to create the last_checked table. The /group list command uses the last_checked table to pull each group’s name, active player count, total player count, and the date the group was last checked. Each time that a group is checked using /group check <group name> for each member’s activity status this table is updated. Reference the bulleted list for an explanation for each column’s purpose.
 Last Time Group Checked Table
Active Rust Server Table
1
2
3
4
5
CREATE TABLE active_server (
	server_id VARCHAR(32) PRIMARY KEY NOT NULL,
	server_name VARCHAR(128) NOT NULL,
	date DATE NOT NULL DEFAULT CURRENT_DATE
);
server_id: Server’s Battlemetrics server ID value as the primary key.server_name: The server’s name.date: Timestamp when server is set.
The final table to create is the active_server table. Copy and paste the SQL code into the Postgres CLI prompt to create the active_server table. Reference the bulleted list for an explanation for each column’s purpose.
 Active Server Table
(7) Clone RustOps Repo
Now go to my GitHub RustOps repository and copy repo URL.
 Cloning RustOps Repository
Open a separate command prompt and clone the repo to your system. by executing the following command. Ensure you change your current working directory to RustOps once it’s successfully cloned by executing cd RustOps.
1
git clone https://github.com/est15/RustOps.git
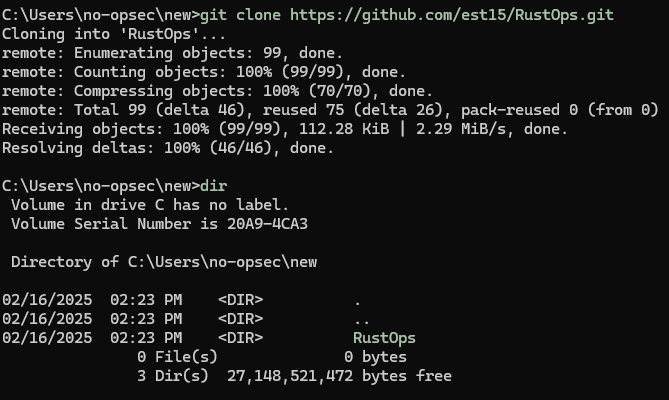 Successful Repo Clone
(8) Push RustOps Repo to your Heroku Application’s Repo
From within my RustOps repository’s directory, the next step is to push this code to our Heroku application’s repository. Execute the following two (2) commands to ensure that our remote repository is set to the Heroku application.
1
2
heroku git:remote -a herokuappname
git remote -v
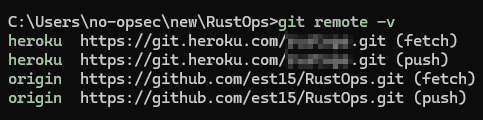 Repo Verification
Then push my RustOps code to the Heroku application’s repo. Remember if the authentication fails copy the authentication token outputted from heroku auth:token. Then use that token as the password when authenticating to the git credential manager.
1
git push --set-upstream heroku main --force
The next step is to merge our most recent changes with the Heroku application’s repository we cloned previous. First, change back to the CMD prompt where we cloned the Heroku application’s repository. Then execute the following command. Once this command has completed execute dir in this directory. We should see all of the same files contained in my RustOps repo in the Heroku application’s repo.
1
C:\path\to\heroku\appname\> git reset --hard heroku/main
(9) Update Environment Variables
Now use Notepad or whatever preferred text editor you use to open the .env environment variable configuration file. Replace your API tokens with the placeholder variables, and ensure they’re inside of the quotes. Additionally, make sure to paste the previously copied database credentials URI so the script can authenticate to the backend database.
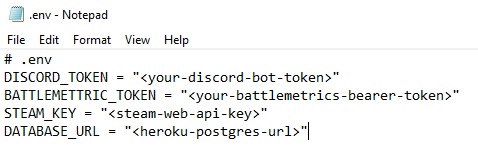 Example ENV File
Once the environment variables have been entered the final step before start a worker is to push these changes. Execute the following commands, giving the commit a unique title, anything works.
1
2
3
git add .
git commit -m "Commit Title"
git push --set-upstream heroku main
(10) Run the Discord Bot
Once the changes have been successfully pushed to the repository the next step is to start a worker. This is going to execute the worker: python rustops.py command as detailed in the Procfile. Execute the following command to start a worker and then verify the worker’s execution.
1
2
heroku ps:scale worker=1
heroku ps
 Heroku Worker Execution
(11) Use the Bot
With all of the above steps completed the RustOps (or whatever name you decided to give your Discord bot) should now be up and running. Reference my GitHub RustOps repository’s README for a detailed description of all supported commands and an example usage walkthrough.
4b. (FREE) Locally Run the Discord Bot
This section walks through the steps to host the Discord bot locally using your PC. Note that I have not tested the performance impact that this would have when you’re also playing Rust. I have yet to create this implementation, but the plan is to create a Docker container that you could easily download and run. I will update this blog post to accommodate that if ever completed.
RustOps Bot Lore
It all started when I came across a Reddit post about a Rust bot that queried game servers directly via their UDP port. This method was allowed in previous versions of Rust by pinging the server’s UDP endpoint directly. This allowed for retrieving player information in real time without needing any middleman like BattleMetrics. However, a certain update in Rust enabled player name obfuscation by default, which rendered this method unreliable. You could still reach the server, but the data returned was essentially randomized names like Mario, so player names were no longer accurately represented.
I knew from discussions with friends that other alternatives for tracking player activity existed. That’s when I discovered the BattleMetrics API. Unlike the unreliable UDP scraping method, BattleMetrics offered structured and consistent access to Rust server data. It not only tracked which players were online but also maintained historical data like last seen timestamps and session durations. Although, I did notice that at times players with matching usernames were tracked as the same player, so its not a full proof method.
With BattleMetrics as the foundation, I built the first pilot version of RustOps (originally called ServerSpy). It was extremely rudimentary at the time. The bot included a basic server search feature: users could input keywords to search for a server, and it would return the top 30 matches. From there, users had to manually copy the server ID and use it each time they wanted to run a player check.
The core logic of ServerSpy was simple: when a user asked to check if someone was online, the bot would send a request to the BattleMetrics API for all currently tracked players on the specified server. It would then parse the list of usernames and compare each user to the one provided in the command. If there was a match, the player was flagged as active.
While functional, this version had a few major flaws I hadn’t considered at first:
- Non-unique player names – Rust allows multiple players to have the same username. This meant my bot could return false positives if more than one person shared the same name.
- Undecodable names – Some usernames stored by BattleMetrics couldn’t be parsed into readable text and were instead stored as raw bytes (which showed up as empty). I wouldn’t figure this out until much later during development, and it created major blind spots in the results.
Eventually, I shared ServerSpy with a friend’s group of Rust players to get feedback. They were receptive but immediately pointed out a closed-source Rust bot they were already using that put mine to shame. They showed me screenshots of its interface and functionality, which included:
- The ability to track groups of players, including how many were online during the last scan and when that scan occurred.
- Individual tracking for each player’s status and last activity timestamp.
- The ability to pass in full Steam profile URLs for easy player identification and tracking.
Seeing the capabilities of this bot was a turning point for me. It became clear that if RustOps was going to be truly useful, I’d need to shift my logic and expand my vision. Instead of simply checking usernames on a server, I needed to build something more robust with capabilities for group tracking and Steam profile URL parsing.
At the time of writing this blog post I have completed development for version 1 of the RustOps Discord bot. I put a lot of effort into version 2 which fixed and improved a lot of features in version 1; However, the Rust group using the bot stopped playing Rust, so I lost an active group to test developement with. I uploaded my last up to date version 2 of RustOps under the DEV branch on my GitHub. The bot is in a workable, improved, state within the DEV branch, but there are issues that I had not fully fixed.